May 2012

Easily Modify .Config Files During an Application Update

The beauty of .Net configuration files (.config) is that they let you easily change the behavior of your application for individual installations. This allows for a great deal of flexibility, especially with service related settings. With this flexibility though, also comes a maintenance challenge. Unlike all of your other application files, configuration files usually can’t be simply replaced during a maintenance update. Doing so would lose any customizations made to support the specific application installation. As your application evolves, it is inevitable that your configuration files will require modification. With AppLife Update, you can easily maintain .Net configuration files without replacing them by modifying the existing files. I’ll cover three different methods that you can use, based on the type and scope of the config file modification that is necessary.

  • Modify the existing config file directly using Xml Update Actions
  • Migrate specific settings from an existing config file to a new config file using Shared Properties and Xml Update Actions
  • Utilize custom .Net code to manipulate the config file during an update

Modify the Existing Config File

Using Xml Update Actions is great for adding elements and updating attributes. As an example, let’s say that we use appSettings in our application and we need to add a new appSettings value in support of a new feature. We can use an Add Xml Element update action to insert a new appSettings value into the existing config file.

This is what the v1 application configuration file might look like:

But for v2, the configuration file might need to look like this:

To migrate version 1 installations to version 2, in addition to replacing the application assemblies we must add a new entry to the appSettings collection. To do this, we’ll use an Add Element update action.
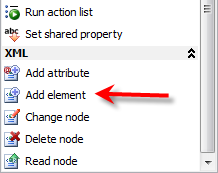
When configuring Xml update actions, XPath expressions are used to reference the specific Xml elements that you are interested in reading and writing. To accomplish our goal, we will use an XPath expression to access the appSettings node, and then add a new element to that node. The config file is located in the Application Directory and is named Simple.exe.config.

The XPath expression is /configuration/appSettings. The element that we are adding is:

<add key=”key2” value=”value2” />

The name of the element is add, and the new element has two attributes, key and value. Add a new Add Element update action to your update project and configure it as below.

With this action in place, the new element will be added to the configuration file when the update is executed.

Another scenario where Xml actions are great is when we need to update a specific attribute. Using a Change Node action, the value of an existing appSettings entry is easily accomplished. For instance, consider the situation where in v3 of our application, we needed the key2 value to be modified to value3. This can be accomplished in a very similar process. Instead of adding an Xml Element, we can use the Change Node update action to modify an existing value. To accomplish this, we need to know the XPath that references the specific value that needs to be changed. In this case, the XPath expression is /configuration/appSettings/add[@key=”key2”]/@value.
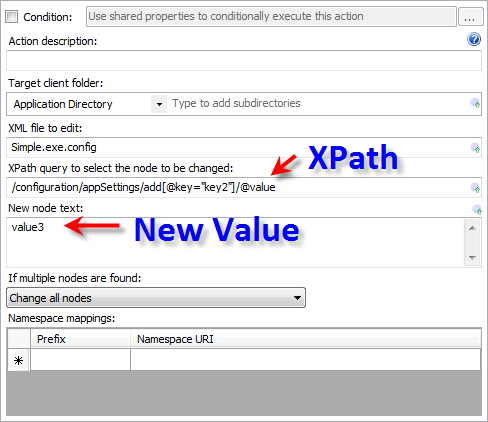
Adding a Change Node action configured like this will modify the attribute value to “value3”.

Migrate Existing Values to a new Config File

In some circumstances where there are wholesale changes to a config file that would require extensive modifications to the existing file, it could require less effort to extract specific values that are unique to the installation and migrate them to a new config file. In this scenario we use Xml Actions to read specific information from the existing config file and store that information in Shared Properties. We can then replace the config file with an Add & Replace Files update action, and finally use Xml actions to write the information that we stored into the new config file.

Revisiting the previous example, we’ll take this approach for the necessary modifications. We’ll read and store the value of the key1 appSetting, then replace the config file and modify that value in the newly replaced configuration file.

Reading the existing value, we’ll add and configure a Read Xml Node Action. Using this action, we set the config file name and XPath just as before. We’ll also designate a Shared Property to store the attribute value. Shared Properties are essentially variables that are scoped across the context of the executing updates. They allow for information to be shared between update actions. The Read Xml Node action will assign the string value of the designated attribute to the designated Shared Property.
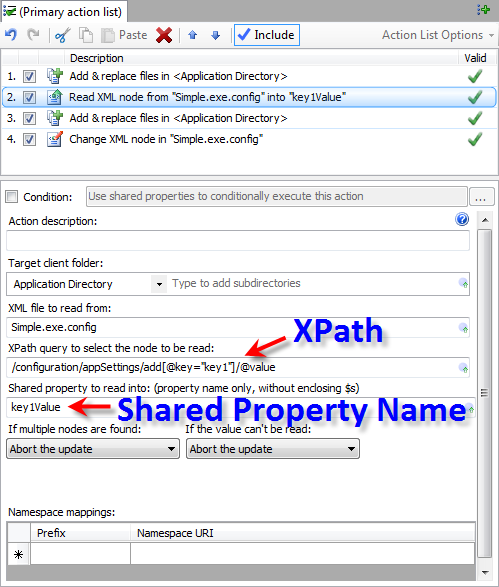
With the value of the existing attribute stored, we can replace the application configuration file using an Add & Replace Files action.
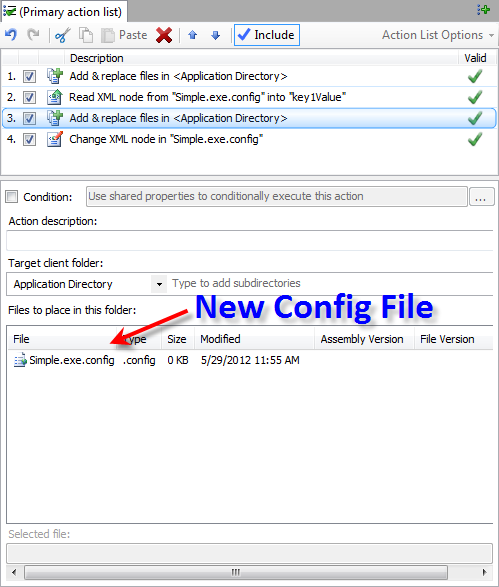
After this action executes, the application configuration file will be replaced with a new updated version. However, the value of the attribute we are interested in will also have been reset to its default, non-customized value. To complete the update process we need to use the value that we previously stored to change the new configuration file. A Change Xml Node update action will update the attribute value. When using string value Shared Properties, the value of the Shared Property can be expanded using $SharedProperty$ syntax.
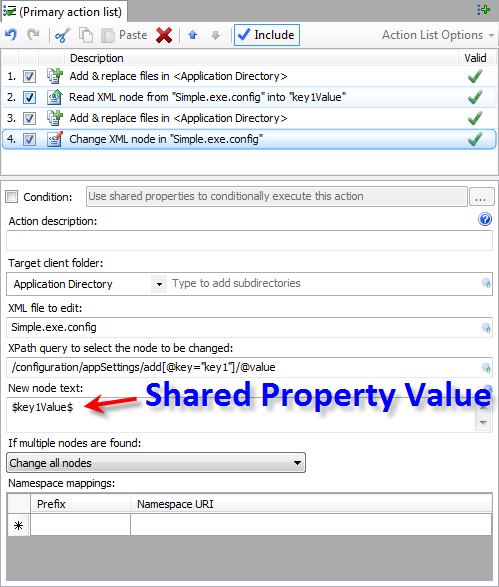
The Change Xml Node action restores the value originally set on the specific client and completes the update process.

Utilize .Net Code to Modify an Existing Config File

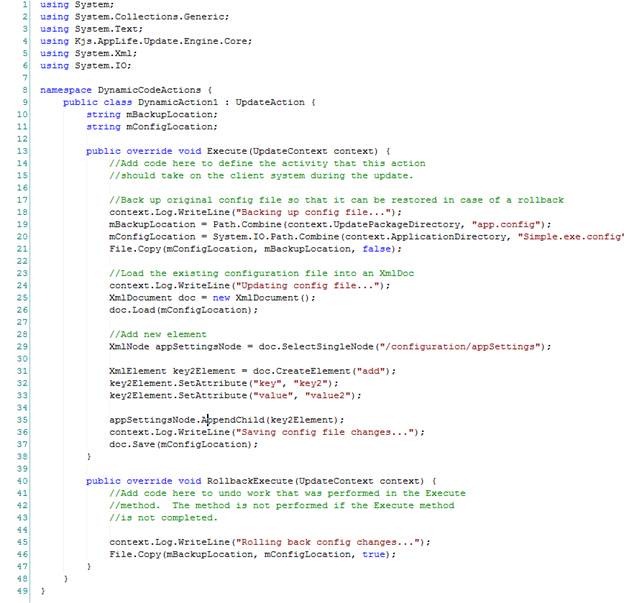
When using Xml Actions and Shared Properties, we read and write string values to the config file. In some circumstances, it can be beneficial to approach the Xml maintenance process within code, where the Xml can be manipulated in fragments. This too can be easily accomplished during an update using the Dynamic Code Action. A Dynamic Code action allows you to easily create a custom update action, which extends the UpdateAction class and overrides, at a minimum, the Execute and RollbackExecute methods.
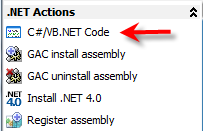
With a Dynamic Code action you can use C# or VB.Net code to manipulate the deployed client. Here we use the context parameter to access the information we need to accomplish our goal in code. You can access local directory information as well as the Shared Properties collection. With this information, we load an XmlDocument and manipulate the file within our custom code.
Summary

During software maintenance updates, application configuration files that are uniquely modified for each installation cannot be simply replaced as changes are made to support new versions. These config files must be modified in-place during the maintenance process. Using AppLife Update, application configuration files can be easily maintained throughout the life of the application and we present three different approaches to accomplishing the goal.

Updating a Windows Service

For applications that deploy a Windows Service, updating the installed service can present a maintenance challenge. This is a scenario where integrating AppLife Update makes a difficult task extremely easy to accomplish. Using AppLife Update actions, a Windows Service can be updated in three easy steps.

  1. Stop the Service using a Stop Service update action.
  2. Replace the Service assemblies using one of the available file replacement actions.
  3. Restart the Service using a Start Service update action.

Tada! Big maintenance challenge accomplished.

An Example

The release of AppLife Update 4.5 included a few very small changes to our AppLife Update Windows Service. Specifically, in previous versions, if the Windows Application Event Log was full and not configured to replace old events, our service would not apply an update.  Here’s how to update a service using AppLife.

Stop the Service

To stop the service, we need to know the service name. If you don’t already know the name of the service you are updating, it can be found in the Windows Service Manager.

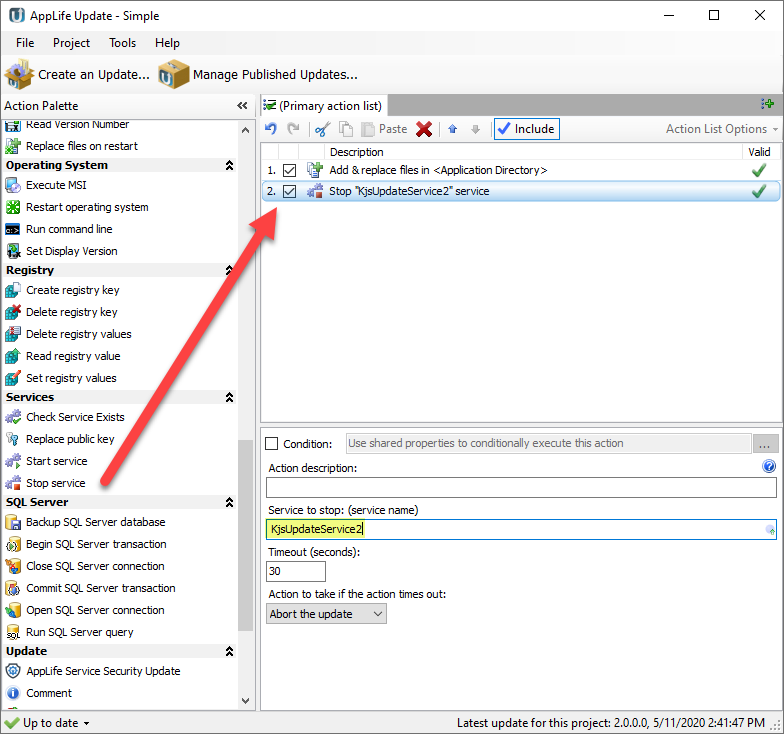
Add a Stop Service action to your AppLife package. Set the Service to Stop property to the name of your service. In this case, the service name is KjsUpdateService2.

Replace the Service Assemblies

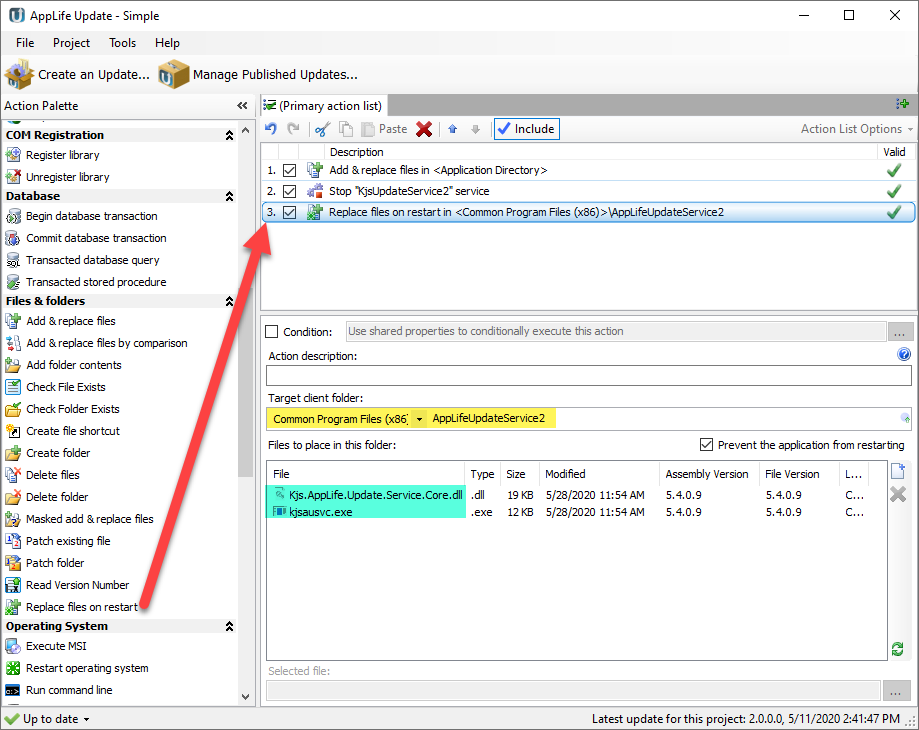
Use an Add & Replace files on Restart action to update the assemblies. The AppLife Update Windows service is initially deployed using an MSI merge module, and is always installed to the Common Files Folder\AppLifeUpdateService2 folder. To update the service, we’ll select the Common Program Files (x86) client folder and set the appropriate sub-directory, and then add the two assemblies that constitute the service. Choosing the x86 variant of the Common Program Files folder will ensure we target the x86 common files folder on x64 operating systems. Using the non x86 Common Program Files directory targets the x64 folder on 64-bit operating systems. On x86 operating systems, there is only one common program files directory, and either variant will target the correct folder.

Note: When updating most Windows Services, even when a service updates itself, the service assemblies can be replaced immediately, without deferring to a restart. The AppLife Update service core assembly houses a class used to marshal information between the User Interface process and the service started worker process. For this reason, even though the service is successfully stopped, a lock is still being maintained on the core service assembly while the update is executed. Because this lock is not released until the update completes, the file replacement is deferred until restart. We do not need to force an operating system restart, as the previous update service can be restarted and function properly until the system is restarted. If a restart were necessary, we could include a Restart Operating System action to accomplish this.

The service assemblies ship with AppLife Update already embedded into the AppLifeUpdateService.msm merge module. After an installation, the assemblies will be in the common program files folder and can be extracted from there. After this action executes, the Windows Service will be updated. Now we just need to restart the service.

Restarting the Service

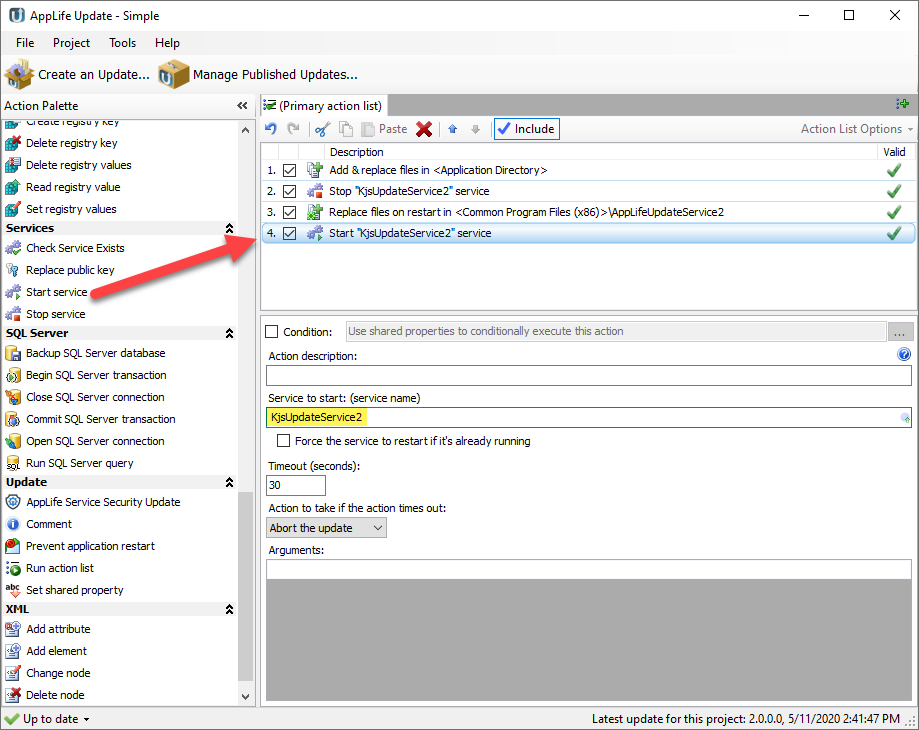
The service is restarted by adding a Start Service update action. The action is configured by defining the name of the service to restart. In this case it is again, KjsUpdateService2.

That’s it! Windows Service update completed.

But My Service is My Application?

This example assumes an existing update process exists and can be utilized to update the Windows Service. This is usually an installed application that utilizes the Windows Service, and can take responsibility for updating it. A stand-alone Windows Service can become “Self Updating” just as easily by integrating an update process using the AppLife API. There is one point to make in this scenario. When applying an update, you want to use the option to instruct the update controller not to shut down the host application (the service). The Stop Service update action performs a proper service shutdown through the use of the Windows Service Control Manager, and is the recommended method to use when stopping a service for an update.

Using AppLife Manager is also an excellent option for deploying and maintaining Windows Services.  AppLife Manager is turn-key and requires zero code integration.

Using Callable Action Lists Part II

In my previous post I used a callable action list along with Xml Update Actions to read all of the database connection strings identified in an app.config file, then iterate and update each one of the databases during an application update. The approach I took to accomplish the goal only used built-in Update Actions that are available to me in the Actions Palette. I purposefully chose not to use dynamic code actions (custom update actions) to make a point of what we can accomplish without resorting to writing our own code. However, what can be accomplished with a little custom code is extremely powerful, so now I’m going to revisit the objective, removing the intent of relying only on built-in actions.

Identifying the Databases to Update

In this scenario, the local databases that need to be updated during our application update are listed in the application configuration file. This is very convenient, especially when I want to use built-in actions to find the information. But what if the databases were not so conveniently discoverable? What if you first had to connect to a database server and search through all of the databases on the server for a specific naming convention? What if the databases were passed into the update process from the host application? Using a dynamic code action, scenarios like this can be easily handled.

Custom Update Actions and Shared Properties

The feature duo that makes what might initially sound difficult to accomplish during an application update magically easy using AppLife Update are Custom Actions and Shared Properties. Custom Actions are simply classes that inherit from an UpdateAction base class and implements at a minimum, an Execute method and a Rollback method. Shared Properties are a collection of objects that are scoped to the context of the update and can be accessed from any update action.

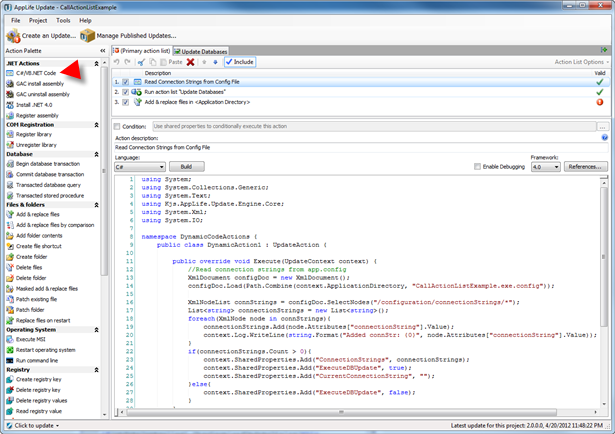
For our purposes, we want a custom update action that will read the list of databases from an application configuration file. The C#/VB.NET Code action lets me write this custom action directly within the update creation software.

Note:  Custom Actions can also be created in Visual Studio and compiled to an assembly.  Custom Action assemblies can be added to an update project through the Project..Settings dialog, or added the Custom Actions folder located within the AppLife Update install directory.

Here is the code:

Code Snippet

1:  using System;  
2:  using System.Collections.Generic;  
3:  using System.Text;  
4:  using Kjs.AppLife.Update.Engine.Core;  
5:  using System.Xml;  
6:  using System.IO;  
7:  namespace DynamicCodeActions {  
8:    public class DynamicAction1 : UpdateAction {  
9:      public override void Execute(UpdateContext context) {  
10:        //Read connection strings from app.config  
11:        XmlDocument configDoc = new XmlDocument();  
12:        configDoc.Load(Path.Combine(context.ApplicationDirectory, "CallActionListExample.exe.config"));  
13:        XmlNodeList connStrings = configDoc.SelectNodes("/configuration/connectionStrings/*");  
14:        List<string> connectionStrings = new List<string>();  
15:        foreach(XmlNode node in connStrings) {  
16:          connectionStrings.Add(node.Attributes["connectionString"].Value);  
17:          context.Log.WriteLine(string.Format("Added connStr: {0}", node.Attributes["connectionString"].Value));  
18:        }  
19:        if(connectionStrings.Count > 0) {  
20:          context.SharedProperties.Add("ConnectionStrings", connectionStrings);  
21:          context.SharedProperties.Add("ExecuteDBUpdate", true);  
22:          context.SharedProperties.Add("CurrentConnectionString", "");  
23:        } else {  
24:          context.SharedProperties.Add("ExecuteDBUpdate", false);  
25:        }  
26:      }  
27:      public override void RollbackExecute(UpdateContext context) {  
28:        //Add code here to undo work that was performed in the Execute  
29:        //method. The method is not performed if the Execute method  
30:        //is not completed.  
31:        context.SharedProperties.Remove("ConnectionStrings");  
32:        context.SharedProperties.Remove("ExecuteDBUpdate");  
33:      }  
34:    }  
35:  }  

Notice that through the context parameter, the code can access the Shared Properties collection as well as other properties, such as the physical path to the host application. This code simply opens the application configuration file and reads the database connection strings. These strings are then added to a generic List of strings, and that List is added to the Shared Properties collection. If the list is not empty, another Shared Property is added that will be used in a conditional statement.

Manipulating the List from other Actions

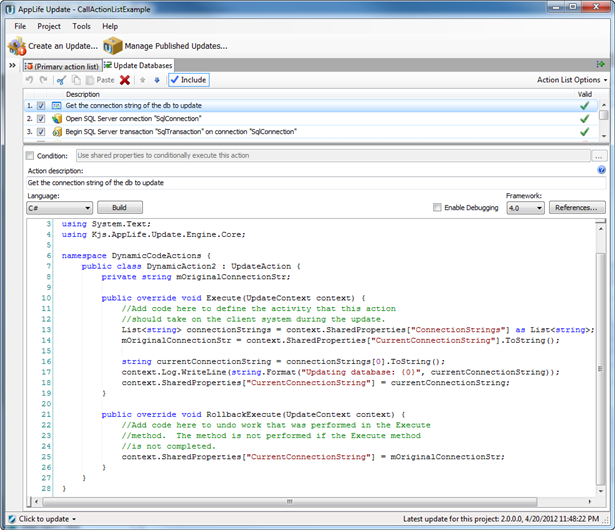
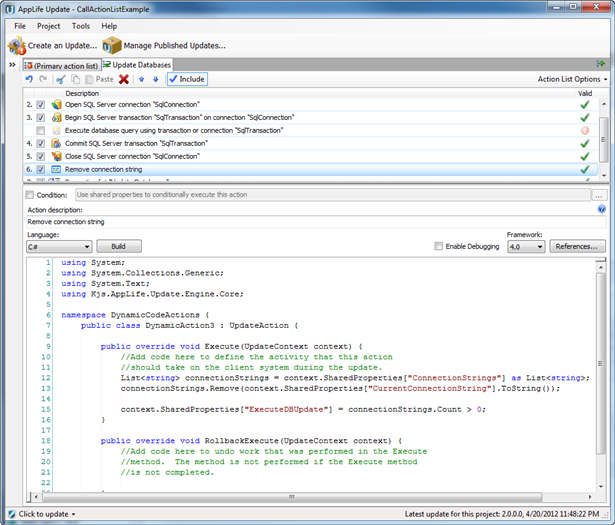
With the list of database connection strings in the Shared Properties collection, we can call the recursive callable update action list to update the databases. This in-memory list takes the place of the copied app.config file used in the original post. From within the Update Databases action list, we can read and manipulate the Shared Properties collection with other custom update actions.

Read the Next Connection String

Remove the Item after the Database is Updated

Conclusion

Using Update Actions and Shared Properties during an application update allows you to very easily accomplish complicated processing on deployed clients. The C# / VB.NET update action lets you add your own code logic to your update, and using Shared Properties, your code can easily interact with built-in actions as well as other custom actions.

Download Example AppLife Update Project

Scroll to Top